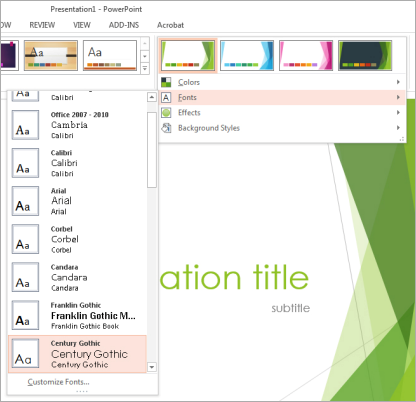
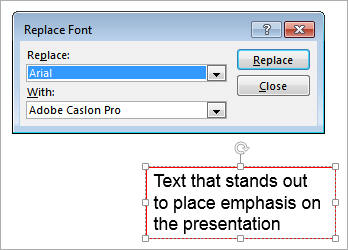
PowerPoint 2013 has a number of convenient features that allow you to change the fonts on a single slide or throughout your entire presentation. By changing the fonts, you can make your presentation more attractive and highlight parts that require more attention.


A word of caution: Once you have changed a font in your presentation, you should check whether the new font needs resizing. This is because not all fonts are equal in size (for example, size 24 in Arial font is very different from size 24 in Monotype Corsiva font).
There are some classic mistakes that PowerPoint users all over the world make time and time again. Here’s a slideshow of the most common pitfalls with tips on how to avoid them:
In this post, you will learn how to create a text crawl similar to the one used at the beginning of the Star Wars films. Here's a video of the final PowerPoint presentation:
To achieve the text crawl effect, I basically had to do three things:
You can find step-by-step instructions on how to create the same effect below:


The resulting .pptx file is available for download here.
Most of us aren’t naturals on stage. Nevertheless, we almost all have to speak in public at one point or another. Whether the situation involves a casual talk with a small group of people or a formal speech before a large audience, the ability to speak well and fluently in public is an important one.

If you find yourself going silent or turning red in front of a crowd, try following these guidelines to improving your public speaking skills.
No matter the subject or the context of your speech, you should always be sure that you know your topic well enough to feel comfortable talking about it to a group of people. If you’re an amateur astronomer, for example, you shouldn’t have any problems trying to find things to say about astronomy. If, however, you’re asked to talk about the law, and you aren’t exactly a legal expert, you may find it very difficult to speak to a group about it.
This may be a very obvious piece of advice regarding public speaking, but it is surprising how easily some people can fake their way through a speech on a topic about which they know little. There are a select few who command such mastery over words and who are so comfortable on stage that they can talk about almost anything to a crowd. Most of us are not so gifted. If you have serious problems speaking in front of an audience, knowing your subject matter well is an absolute necessity. It will make you feel more relaxed and give you the freedom to stray from your notes when appropriate and return to your next bullet point later on.
By definition, public speaking involves an audience. An audience can be as small as a group of five students clustered in a tight semi-circle around a chalkboard or as large as a crowd of thousands in a massive theater auditorium. Even a few people sitting at a bar or around a restaurant table can be considered an “audience” in the right context. Your audience can also differ in composition: an auto insurance sales lecture and a speech at a sci-fi convention will undoubtedly attract very different sorts of people.
If you are nervous about speaking in public, the reason is the audience – how they perceive you and whether they like your speech or find it dull. Therefore, it is vital to know your audience before you step onto the stage. Know what their interests are and how they might feel about the subject you’re dealing with. If you understand the expectations your audience has of you, you can more effectively tailor your speech and your performance to meet those expectations. And remember, if you see a few people yawning or looking bored while you speak, that does not mean that the audience hates you. Different people have different ways of reacting to a speaker, and it is likely that a few of your audience members simply aren’t interested in the subject matter of your address. Do not fix upon these few people and allow them to wreck your entire performance.
A great public speaker will seem to glide through his speech as though he were improvising it. This is usually not the case. The great majority of speeches are planned out and written, either in whole form or as an outline in note form. The best speakers just happen to be so natural on stage that audience members don’t realize they have notes or a written speech in front of them.
Whether you are new to public speaking or you’ve already had a few rough experiences with it, remember to always take notes with you to read from. Notes in bullet point form will help you keep your mind on target while you speak. Without such notes, you might easily stray from your subject and end up in a place thematically hundreds of miles away from where you should be. Don’t let this happen to you. Notes will keep you on the road from the beginning to the proper end of your speech and prevent you from rambling.
You might feel silly doing it, but making your speech in front of a mirror might make you more comfortable with yourself and your public speaking ability. We often have an image of ourselves that is not quite accurate, and we usually tend to exaggerate our negative qualities more than our positive ones. If you watch your body language and your posture while you make your speech, you will be able to better judge your true faults as a speaker and what you’ll need to work on before you get on stage while identifying and ignoring the purely mental faults that don’t actually exist.
Following these few tips won’t turn you into a perfect public speaker. Barring a miracle, you probably won’t become a Theodore Roosevelt-level speaker overnight, no matter how much of an effort you make. With the right kind of practice and the proper mindset, however, you will be able to greatly improve your public speaking ability and thus find the confidence that you need to succeed.
Version 1.1 of ShapeChef is now available for download. In addition to dozens of bug fixes and performance improvements, the update includes the following major enhancements.
ShapeChef’s new copy and paste functionality makes it easy to move items around in your shape library. This works in the same way as moving files in Windows Explorer. You select a shape or category, right click on it, and select “Copy” or “Cut” from the context menu. ShapeChef also supports common keyboard shortcuts, such as Ctrl+C for copy and Ctrl+V for paste.

We have extended the application’s import functionality, allowing you to directly import image files into your shape library. Many common image formats are supported, including PNG, JPG, and EMF.

By default, the categories in your shape library are ordered by their names. Starting with this version, you can change this behavior by assigning sort keys to categories. The categories will then be sorted by their keys first and then by their names.

Another change is that ShapeChef now remembers the expanded/collapsed state for each category in a shape library and restores it at the next start.
ShapeChef Version 1.1 is a free update. Just download and run the installer from here, and enjoy the improvements!
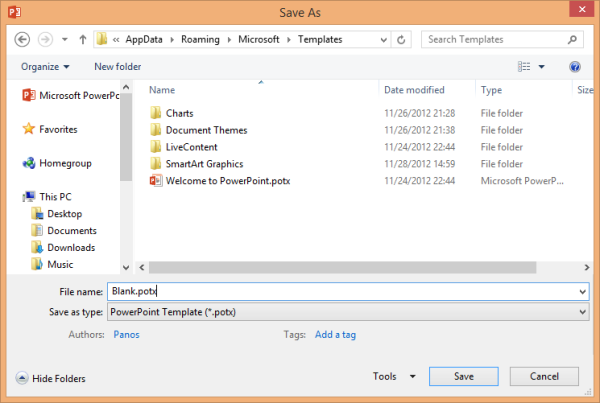
Every time you start PowerPoint 2013, you are automatically provided with a blank presentation theme. The default font of this blank presentation theme is Calibri. You can change this font according to your preferences by following a series of steps.


Now, every time you open PowerPoint 2013 and choose FILE → New, your template appears as the first option in the Presentation Gallery. It will be labeled as the Default Theme and will include the previously configured font.